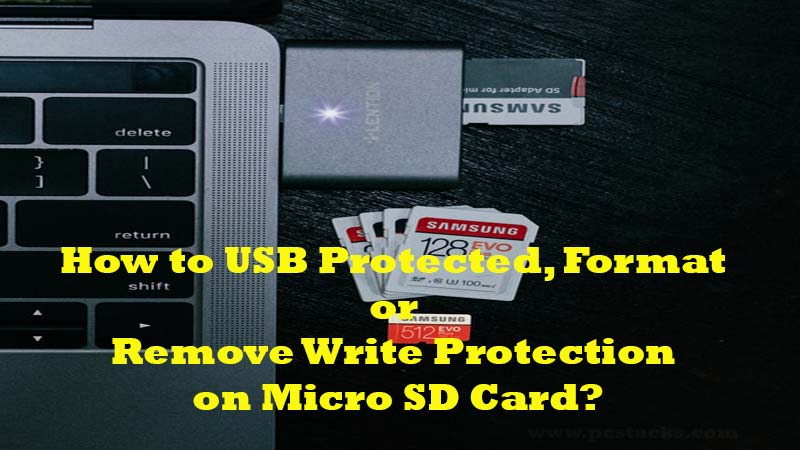
Are you curious to know how to format or remove write protection on micro SD card? Well, you can definitely do it if you take some steps which we are going to discuss here.
Removing write protection from any card can become important at various times because of several reasons.
The most probable reason is that you will never be able to do anything on your SD card if it is protected.
In most cases, neither you will be able to do file movements nor you can read the content of the card. This can happen to anyone with any type of flash memory card.
So, if you really want to access the content of your Secure Digital card, you should remove this protection first of all.
A write protection can be placed on an SD card because of various reasons. This could be physical reasons as well as internal reasons.
Another circumstance could be there when your card faces any kind of damage. Various people may put this restriction using third-party software.
But, regardless of the reason, we are going to know how you can easily remove this protection and start using your USB digital card properly. This will happen only if your card is working fine and do not have any physical damage and only internal restrictions.
If this is the case, this article will provide you with all the information you will need.
Whether you use your micro card inside your PC, cameras, or any other thing, this limit can be placed because of the user’s intent or automatically in some special cases.
But, if another person has placed this restriction, you can try to remove it. And most of the time, you will be able to do it pretty easily.
This article is going to cover all the steps you should follow to do the same.
In a nutshell, you will be able to remove the write protection of your SD card by the end of this article.
So, keep reading until the end.
Table of Contents
What is the write protection in an SD card?
As the name suggests, write protection is a process used to refrain anyone from accessing or modifying the data inside an SD card.
This restriction could either be physical or internal. Because most of the cards comes with a separate switch to enable to disable this thing, you can easily use it without the need of any software to do the same.
However, there could be an internal system to stop anyone from changing the contents inside your USB card.
If the card isn’t your’s and someone else has put this protection, it is obvious that there is something important stored in that card.
So, before removing this protection, you should keep all these things in mind.
In simple words, you will never be able to use your memory card for any purpose before you remove these things properly.
What are the causes of SD card write-protection error?
If you are trying to open your SD card on your computer, you will see an error if it is write-protected.
The error may vary as per the OS and the type of restrictions.
But, it will try to highlight that you can’t add additional data on that card or even delete the existing data. Even if you try to format your flash card, it will not happen in any case if the write protection is enabled.
There could be various causes you might see this error. Not only you will see if someone has used software to put this restriction.
This could also happen because of some other reasons.
Some of the main reasons are as follows.
- Memory card is locked and showing write-protected error
- SD card contains bad internal file systems
- The card has got encrypted by a malware
- The card is physically damaged
- SD card is locked by a third-party write-protection software
All these reasons could be there to stop you from doing your desired tasks on your secure digital card. But, there are various other hidden reasons behind this issue.
Without talking much about it, we should directly jump on to the solutions. So, let’s see how you can remove this restriction using simple methods.
Quick Steps to remove the USB Write Protection from an SD card (Before Format)
Below are all the steps to remove this protection and start using your SD card in the normal way. You should be able to do it if you follow all the steps properly.
Check if SD card is locked with the physical switch
On most of the SD cards, you will have a physical switch on its side. This switch is given specifically for the task of enabling or disabling these features from your flash memory card.
In other words, if you have turned this switch to On, you will never be able to write anything on it.
However, if you are turning it off, it will work normally.
So, whenever you insert your card on your computer with this switch ON, it is obvious that you will the write-protected error on your screen.
Even if you are using an SD card adapter to run a small Secure Digital card on your PC, you will have this button and this is the thing you will have to check.
Let’s see how you can do it.
- Remove your SD card from your PC
- Check for the small switch on its side
- Make sure to keep it on the Unlock side
- The unlock side will mostly be on the top end.
Now, you can try to insert your card back on your computer and see if it is working fine. If not, just go to the next step.
Remove write-protection with the help of an anti-virus software
In various cases, your card may get encrypted by a virus or malware. And it will be tough to detect if this has happened in your case as well.
So, you should keep this thing clear before you go further and jump into some complex solutions. You just have to use good anti-virus software and scan your SD card thoroughly so that it can get scanned and cleaned.
This will remove all the viruses and malware encryption and let you use your card in a normal manner. This thing has worked for lots of people and you should definitely give it a try.
But, it is important to use good quality software for this process because some viruses could be pretty dangerous and hard to detect.
Just, follow the process given below for more.
- Download any premium anti-virus software and install it on your computer
- Insert your SD card
- Open your software and scan your micro card for malware
- Let your software find any virus and delete it.
Once it’s done, just re-insert your Secure Digital card and check if it is working fine. If it isn’t, go to the next step.
Fix the issue using Registry
Before using any other tough solutions, we should definitely give the Registry a try to fix it.
In fact, the Windows registry menu could be a helpful solution to do this work properly.
But, you should handle this feature properly because any wrong step in this menu can disrupt the whole operating system. If you are following this procedure properly, you will be able to fix it for sure.
Keep a thing in mind that you are doing it completely on your own. If something wrong happens with your system during this, you might not be able to revert it back.
Now, let’s see how to do it.
- Open the Run command using the Windows+R key together
- Enter regedit and then hit Enter

- After that, go to this path:
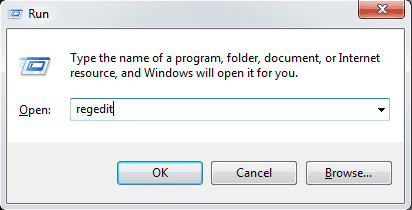
HKEY_LOCAL_MACHINE\SYSTEM\CurrentControlSet\Control\Storage
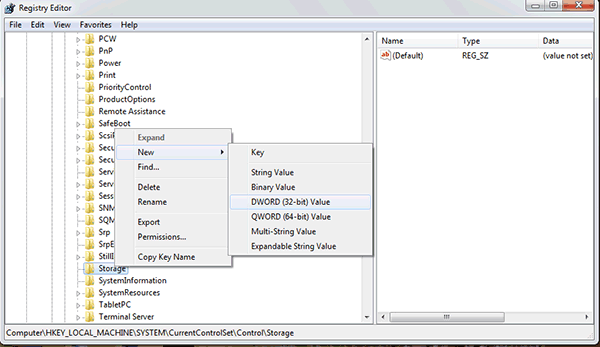
- Locate Storage or StorageDevicePolicies and right-click it.
- Choose the option New>>DWORD Value and name it
- Double click on this option and change the value to 0 and then press OK.
After doing this, just close the Registry Editor and restart your computer. Check if you are seeing this error again. If yes, just go to the next step.
Remove the right protection using Command Prompt
Command Prompt can also handle various kinds of read and write tasks on our system devices and the external devices as well.
So, you can use this Windows tool to easily remove the read-only restriction. However, most of us are not aware of the process to do the same.
But, it is easy to do using some simple commands on the main command panel. This will be pretty easy to do because you just have to follow a simple procedure and copy/paste the commands we are going to discuss here.
In this way, it can be a good way to remove write protection on micro SD card. Let’s see how to do it without any hassle and get your memory card back to its normal position.
- Connect your SD card to your computer
- Go to Windows search bar and search for Command Prompt
- Open this menu and type diskpart on the command line. Hit Enter after that.
- Now type these commands one by one and hit Enter after each entry.
list disk
select disk # [# = the number of write-protected drive]
attribute disk clear readonly
Close Command Prompt
After doing this, you will definitely be able to see some good results. If you are able to do writing tasks on your card then you are good to go.
Otherwise, just proceed to the next step.
Disable write protection using GPEdit
Windows GPEdit is another great tool to remove your SD card’s write-protection. This feature can be used for various other tasks on your computer and for external devices.
But, here we are going to use it for this task and see if it works. So, if someone has restricted your card using the Windows local group policy, this method is going to be working for you.
You should be aware of the process of disabling this thing. By doing that, you can easily use your SD in your desired way again.
If you are finding it hard to follow the process and find this feature, you can simply follow the procedure given here.
Let’s see how you can do it.
- Press Windows+R keys together to open the Run command
- Type msc and hit Enter
- Inside the Group Policy editor, go to Computer Configuration>>Administrative Template>>System>>Removable Storage Access
- Disable this function: “Removable Disk: Deny All Access”
By doing this thing, you should be able to get your SD card back into its normal condition and use it for any kind of read and write task. If you are still not able to do so, just proceed to the next step.
Run CHKDSK command to fix disk errors
This is another great way to try fixing your SD card’s write protection. This feature will work with the help of the Command prompt but this time, we are going to use another method to fix it up.
The reason is that sometimes your flash card got decrypted because of some internal errors and appears to be write-protected. It will through the same error as a write-protected micro card.
But, there is something else going on inside this type of card. And, you should not forget to fix this thing if you have done everything else on this list.
Only an expert will be able to understand this command and run it properly.
But, here in this step, we will give you a detailed overview of how you can do it very easily. You just have to follow the steps and you will see the results.
Let’s start.
- Connect your SD card to the computer
- Open the command prompt just like we did in the Method: 4
- Enter the first command diskpart and hit Enter
- Now, type chkdsk E: /f /r /x and hit Enter again [E should be the drive letter shown with your storage card on your computer]
- Wait for some to let your computer check for any error inside your storage device.
Once the process is completed, just close the Command Prompt and restart your computer if you want. Now, check if your drive is working fine. If not, go to the next step.
Remove the Write protection using EaseUS utility
You can just skip all the command methods we have discussed above and just try to use this method firstly.
EaseUS is one of the most popular computer utilities you can ever find on the internet.
This helps us to keep our computers in a good condition by checking and eliminating most of the internal issues.
So, you can easily use this one to remove the write-protection on your SD card. The software is having an inbuilt function to do the same and you should try to use it if you have stuck at this place.
The tool is totally safe and easy to use. You can download it simply from the official website and it will work perfectly in the way you want.
Just follow the procedure given below.
- Download EaseUS Tools M.
- Run this utility after connecting your micro card to the computer
- Choose the Write Protection option
- Select the device which is write-protected
- Click Disable to remove the protection
Close your software after doing it and check if your SD card is working fine.
What if my SD is still write-protected?
In that case, you can try to get in touch with the company support teams or find a data recovery expert in your area.
It might be possible that your SD is completely damages and you may not be able to get it back into the normal condition.
It is also possible that you have to lose all your data inside this card.
But, in some cases, an expert will be able to fix it using some specific techniques. If they are also not able to fix it, you can just throw your card away and buy a new one.
Final Verdict
All the methods given in this article are fully tried and tested. So, anyone can work for you and you should never skip any of the methods from this list.
Anyone could be the answer to your question how to remove write protection on micro SD card?. We also encourage you to try some other methods you can possible find on the internet.
A different thing can also work in a different situation. So, you should never leave anything behind.
We hope you will find this article helpful and it will help you to get your memory card back into the normal condition. If it has helped you, make sure to share it with others as well.
Also, give us your valuable feedback and let us know what you think about it. You can also give us new ideas and suggestions for other articles. We will definitely help you with everything you want.
We keep coming here with latest articles on technology, software, and various other topics.
So, stay connected with us if you like this kind of content.