Want to enhance your computer CPU performance by prioritizing the processes which are important for you. Well, the process of doing the same is pretty easy. However, you should follow the procedure properly in order to get the most out of it. So, in this article, below, let’s know everything about the set CPU priority to prefer foreground task in Windows. We will be covering detailed aspects of this thing along with the processes, benefits, applications, advantages, and enormous other things.
In other words, this article is all about the process of making your computer aware of the processes and apps you want to enhance. Windows computers offer numerous features and capabilities to its users. Also, when it comes to the customization’s, we are free to pick our desired performance levels on our PC.
When it comes to enhancing performance especially, Windows PC will offer you some advantages over various other computers. Ranging from battery optimization to overclocking, we have numerous things to do with our computers. But, today, in this article, we are going to cover a different thing. We are going to know about the ways to set CPU Priority to prefer foreground apps in Windows.
Because Windows is a versatile operating system, it offers numerous ways to perform a single action. So, if your concern is how to set the CPU priority, Windows has numerous options to do the same too. We have researched a lot and found three different ways to get this thing done expertly.

So, we are going to cover all of them here to help you properly. We will give you a detailed overview to get this thing done without any issue.
Lots of Windows users might have been aware of the applications of Task Manager to prioritize the apps. But, doing this will fix the things temporarily. There are numerous other ways to get it done permanently.
Without any further discussion, let’s cover all those things in this article. Once you follow this information until the end, we promise you will know how to set priority windows 10?
You can either pick a professional to do this thing for you. But, if you follow this article thoroughly, we assure you that you will be able to enhance your computer performance for any of the installed app. So, without any discussion furthermore, let’s get directly into the matter.
Table of Contents
Does CPU Priority Impact Performance?
This is the main question you might want us to give an answer. In most of the situations, it impacts your performance a lot. In fact, your PC performance will increase for sure if you are utilizing it correctly. That means, if you are making your PC free from Junk and running the desired app at a time, you are definitely going to have the best effects of changing CPU priority.
Changing CPU priority basically means you are telling your computer to either focus on background or foreground apps. So, if foreground app performance is something you want to be the best in your PC, changing CPU priority is going to give you the results you need. This means, your computer will give priority to the apps you’re using at that time.
That doesn’t mean that your PC will start to neglect the background apps. It will work normally for those apps too but allow you to do your desired tasks more efficiently.
If you want to know how to change CPU priority, you should know what are its benefits. We are going to cover those things too below. So, let’s jump to the next point with any delay.
What are the benefits of changing CPU Priority?
Before you know how to set priority windows 10, you should be aware of its benefits. If you already know the benefits, you can proceed further to the next point. But, if you don’t know anything about the benefits, you should know them. Because we are going to give our computer special preferences to focus on the foreground apps.
So, it is possible to see some amazing results on your computer. Perhaps, most of you might have aware of its advantages. You will see a boost in performance and the overall processing power of your PC for foreground apps.
In fact, you will be able to able to run your Windows apps and games more smoothly. There are various other things you will see when you change CPU priority for foreground apps. Let’s know about some of those benefits below.
- Less processing lags
- Fast Windows Apps and Games performance
- Lower application opening time.
- Easy to run high-end programs on a low-end PC.
- Easy to run various games in your computer in higher settings.
So, you can expect various advantages from your PC when you update these settings as we are going to do now. So, make sure to follow the procedure properly to have all these benefits.
Steps to Set CPU Priority for Foreground Task in Windows?
The process of doing the same is pretty easy. As we discussed earlier, there are various ways to do it. However, we are going to cover only the main things which you have to follow. We can do that either with the help of power management menu, registry menu, or using the Task Manager. However, you can also do it using the Command Prompt.
So, let’s reveal all those methods one by one so that you can pick the right one for you. After following these steps, you would get your answer to how to set a program to high priority windows 10? So, let’s get started.
Method 1: Using Command Prompt
Command Prompt is an effective way to do various things on your Windows computer. But, because it runs on its command line format, most of the Windows users are not aware of its effectiveness. You can do anything using this tool if you have a knowledge of programming or computer languages.
But, our main focus here is to use Command Prompt to increase the CPU priority. Keep a thing in mind that this process is going to be for the users who want to enhance their CPU performance only for a single app.
For example, if you want to increase the CPU priority for Google Chrome, the command will work only for this specific app. You just have to specify the name of that app and the setting would be changed automatically.
So, let’s know how you can change your CPU priority using Command Prompt in Windows.
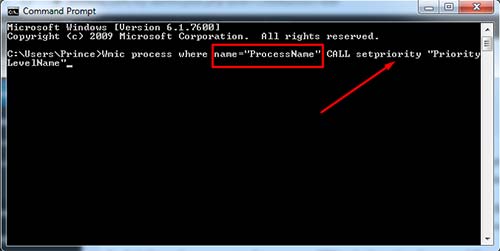
- Go to Windows Search Bar and Search For command Prompt.
- Right-click on Command Prompt and click on Run as Administrator
- Now, enter this command in Command Prompt
Wmic process where name=”ProcessName” CALL setpriority “PriorityLevelName”
Note: Make sure to change the process name with your app name. You can find the process name from Task Manager or your C directory. For example, if you want to change the CPU priority for Google Chrome, the process name will be chrome.exe.
You can also change the priority levels by entering High or Above Normal at the place of “PriorityLevelName”.
- Once this process is done, make sure to press Enter and then close your Command Prompt.
With this process, you have successfully changed your PC Priority to work effectively on any specific app your want. Now, if you want another thing to do this thing, you can proceed to the next step.
Method 2: Using Task Manager
This is perhaps the easiest way to change your CPU priority to work effectively on an app. Task Manager is a user-friendly and easily-accessible tool offered by Windows to its users. Using this tool, you can not only see your computer resources usage but make necessary tweaks on it too. The process of using this tool for CPU priority changing is pretty easy.
You just have to change some settings and you are good to go. Unlike the process given above, you need to have a very little or no technical knowledge to get this thing done. Just follow the procedure given below and you will find it pretty easy to do for the next time.
How to change priority in task manager windows 10?
- Open Task Manager by pressing Ctrl+Alt+Dlt buttons together.
- Go to the Details tab in Task Manager
- Now, find the app or software you want to boost in your Windows PC
- Right-click on it and move your cursor to Set Priority option.
- Now, set your CPU Priority to High, Above Normal, Realtime, or whatever you want.
- Confirm the popup to save the settings and then close the Task Manager.
- Use the same process for any other app you want to boost in your Windows system.
The process is pretty easy to follow and you will be able to get the best results by using this instead of any other method. However, you have to follow the same process over and over again if you have numerous apps to consider.
So, with that said, you might have a brief knowledge of how to set a program to high priority windows 10. Now, just proceed to the next step.
Method 3: Using Windows Registry
This is another easy and straightforward way to do this thing. However, some users may find it hard to navigate the settings we are going to use here. The registry editor is another amazing tool you will find in Windows computer but not all the users not know about this thing.
The registry editor does the things using a different GUI as compared to the one we get along with our normal Windows UI. However, it is the best way to make deep and effective changes to the app settings and various other things. You should not try to play with these settings if you are not aware of what you are going to do next.
However, if you are following these settings properly, it will be easier for you to get things done properly. So, without any further discussions, let’s start the process itself.
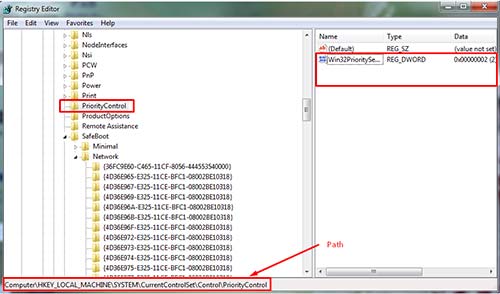
- Press Windows+R button together to open Run Menu
- Now, enter regedit or exe and then hit Enter
- Go to this path: Computer>HKEY_LOCAL_MACHINE\SYSTEM\CurrentControlSet\Control\PriorityControl
- Right-click on Win32PriorityControl option and click on Edit DWORD.
- Change the Value Data to 26 and it will automatically change your app priority for all the foreground apps.
This is the best method to apply these settings across the system. However, there are various other methods to do the same thing. We are going to discuss that further in next step. So, if you do not find this procedure comfortable, you can go for the next method too.
Step 4: Using Windows Settings
Windows Settings is another inbuilt Windows function that can allow you to get this thing done without any issue. There are numerous settings Windows computers will offer to its users. So, if you want to do the above process using a simple GUI, Windows will allow you to do the same.
If you do not have knowledge of that, it could be a tough job for you. We have made it easy for you. Using the method we are going to discuss below, you can make use of these settings to easily change your CPU priority for background or foreground apps.
This process is used by numerous Windows users who want maximum performance from their system. Most impressively, you will receive various other tweaking capabilities on the same menu.
So, without any further delay, let’s discuss how to change your CPU priority for foreground applications.
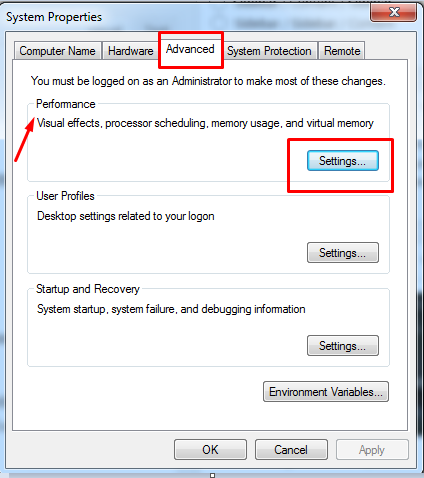
- Go to Windows Search Bar and Search for Control Panel
- Open the Control Panel
- In the Control Panel menu, search for View Advanced System Settings
- In the System Properties menu, click on the Settings option below Performance.
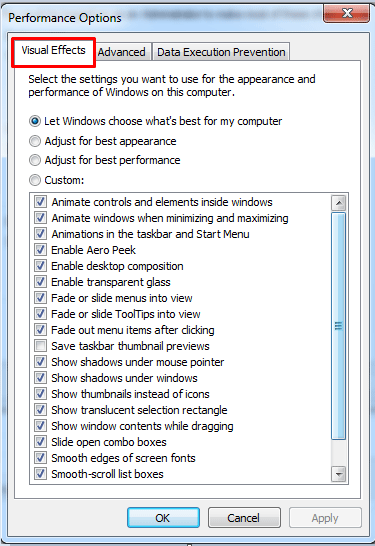
- Now, go the Advanced Tab and make sure the Program option is checked.
- In the visual effects tab, you can change the Priority for the best performance of appearance. (It will improve the PC performance a lot more.)
Using this methods too, you will be able to enhance your CPU performance by making it prioritize the foreground apps. It means you will tell your PC to focus more on the apps you are currently using instead of the ones which are running in the background.
Final Verdict
Doing all these things will help you to definitely increase your Windows PC performance. That means, if you are using your PC for top-notch computing tasks such as gaming, video editing, coding, or anything else, you will be able to run your desired apps more effectively.
So, if you have followed this article properly from the start until here, you will now be able to know how to set CPU priority to prefer foreground application in Windows. These are the simplest and effective methods to do this process for the best results. However, you may find numerous other ways on the internet.
This article was written after doing detailed research and testing works. So, we would appreciate if you share this information with others too. Also, make sure to give your valuable feedback in the comment section. This will motivate us to improve more and more in the future.
Also, you can give us new ideas and suggestions for article. We keep publishing here the most informative articles on a regular basis. So, stay connected and stay reading.