High CPU usage is one of the most common issues you can face on your Windows Laptop. Because Windows OS utilizes numerous files and software while working, various things can misbehave at various circumstances. One of the most common processes which can result in audio device graph isolation issue is your audio controller.
So, if you want to know about how to fix Windows audio device graph high CPU, this article is going to help you a lot. This is one of the most common processes you will see when you are facing some issues with high CPU usage.
Your PC or laptop may heat up a lot because of this thing. Since this process is going to consume your CPU along with the RAM most of the time, you can have various performance issues too.

In other words, you must have to get rid of this problem as soon as possible. Otherwise, it can cause some damages to your computer. Because it is a crucial process in your computer, you should handle everything in a proper manner.
So, below, you are going to know the brief process of getting your computer free from this huge load instantly. Because this process will help your computer to produce the audio outputs, you can’t just delete it by going to its location. Instead of that, you will have to take proper care while fixing this issue on your PC.
But, you have reached the right location. In fact, you are going to have the most effective guide which will help you get your computer back into its normal state.
So, if you are seeing this process regularly in your task manager consuming your CPU usage, just follow this article till the end. You will definitely be able to see amazing results.
Table of Contents
What is Audio Device Graph Isolation High CPU Usage Issue?
As we have discussed earlier, this Windows process has something to do with the audio outputs in your computer. Basically, it is one of the primary components attached to your Windows Audio engine.
Sometimes, you can see an app name written along. This name will be AudioDG.exe. So, if you are seeing something like that in the Task Manager, you are probably having an issue with the Windows Audio Device Graph Isolation issues.
In most cases, this process allows your Windows computer to run the audio effects when any third-party software is working on it.
So, the issue can happen just because of your Windows files or by any software you have installed. Various driver issues can also be there causing this problem for you.
Do I have to uninstall this process?
No, fixing this issue doesn’t include deleting any of the files inside your computer. You should do some troubleshooting steps in order to get this thing solved effectively. Deleting any of the files from your Windows Audio Device Graph Isolation will cause other hassles for you.
Instead of doing it, you should be focused more on fixing stuff. And it is pretty simple to do. Just doing a little bit of troubleshooting and then fixed will be enough for you.
Because this is a crucial element inside your computer, you shouldn’t be doing anything inside the core files. This article is all about helping you in fixing this problem.
So, just follow is till the end and we promise you will be good to go.
4 Ways to fix Windows Audio Device Graph Isolation High CPU Issue
Fixing this issue is pretty simple. You just have to follow a couple of steps and any of them will work for you. You can follow all of them because they aren’t causing any additional hassles for you.
Let’s see how you get this thing done properly.
1. Disable all the Audio Enhancement
If you want to know how do I disable Audio DG? this is your answer. Just by disabling all the audio enhancements, you will be able to stop this service from running. Also, there are huge chances you will be able to fix this whole high CPU usage problem just by doing this.
When you disable the Audio Enhancement feature, the Audio device is going to consume fewer resources and hence give you the outputs you are looking for without putting much load on your CPU.
Disabling and even enabling any kind of Audio Enhancements in Windows computers is pretty easy. Also, this is an amazing feature offered by Windows to support the people who love to listen to music on their computers.
If you are also one of those and using this feature a lot, it is probably the reason behind this problem. Let’s see how you can fix this thing up.
- Just head to the bottom right corner of your computer and right-click on that little Speaker icon.
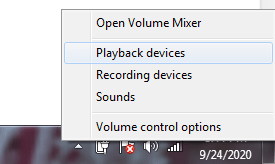
- Now, click on the Playback Device If you have Windows 10 computer, click on Open Sound Settings and then go to the Sound Control Panel.
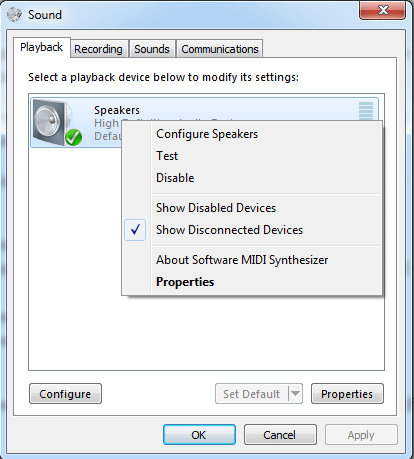
- Now, right-click on the Speaker option and then choose the Properties.
- Go to the Enhancement tab and check the box given along with Disable All sound effects.
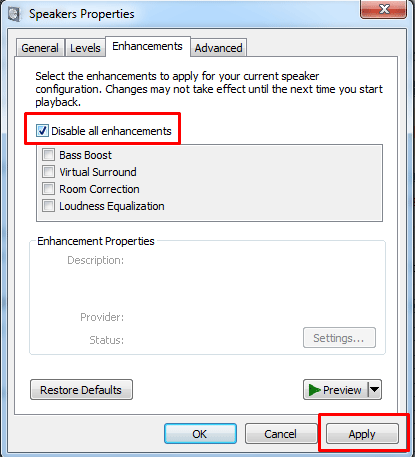
- Click on Apply and then OK.
Once the settings are saved and everything is done, just restart your computer. Your problem should be fixed now. If not, just proceed to the next step.
2. Update your Audio Drivers
As we have discussed earlier, a problematic Audio Driver could also be there behind this issue. So, you can do various things to update your drivers. A simple Windows update is going to help you with this.
When you have issues with your audio driver, you should be doing something to fix this first of all. We have discussed the updating process of various drivers on this website numerous times.
We are going to help you with the same this time too. You just have to update your Audio Driver so that it can work with the latest version. This is going to help your device in various other ways.
In fact, it is important to keep all your drivers updated along with the Audio drivers. It is possible that you are seeing this problem and your computer is misbehaving just because it doesn’t have the write driver to work with. So, in this step, we are going to update it using the simplest process.
Note: You can use any third-party driver updater to do this thing easier for you. But, we will advise you to go with the manual and traditional method. This will help you to get the best results possible in very little time.
- Press Windows+X keys together on your keyboard.
- Click on the Device Manager option.
- Now, in the Device Manager menu, find the option named Sound, Video, and game controllers.
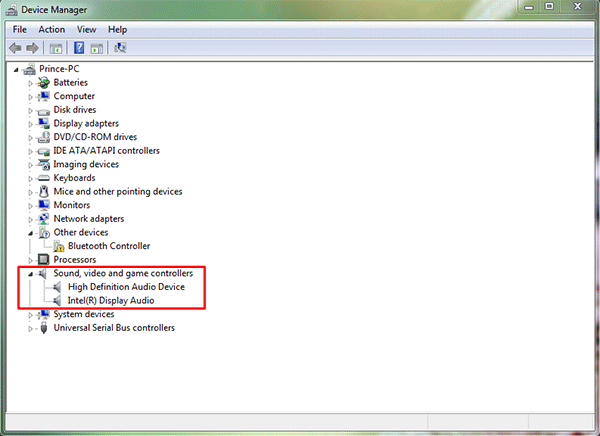
- Now, click on Update Driver and choose the Automatic update method to proceed for an online update.

- You can also reinstall the Driver by choosing the uninstall option and then restart your computer.
Whatever option you choose, make sure to restart your PC after the whole process. It will apply the changes immediately.
Once the computer is restarted, just see if the problem is fixed. If not, just go to the next step.
3. Get rid of Malware
Most of the time, this issue is caused by some malware on your computer. They are going to impact your device in various manners and this is the most common reason for this issue too.
So, your Audio Device Graph might be impacted by the viruses too. However, it can do some other things that can cause this issue to happen.
In simple words, you just have to make sure that your computer does not have any malware inside it and you know how to do it, just run a Virus scan and see if there is any malware, adware, or other viruses inside your PC. If something unwanted is there, just delete it and you are good to go.
But, here you have to consider one most important thing. And that is, using the right Anti-Malware software. In order to completely scan your PC and check if there are viruses inside it, you should be having a Premium virus scanner.
You can make use of Windows Defender scan too. But, it is advised to go with any other software too if you have serious malware issues on your computer.
This is going to help you fix numerous other things on your PC. So, just do this thing and see if it can fix your problem. If it hasn’t done anything for you, just proceed to the next step.
How to run a Malware Scan in Windows 10?
This is a pretty easy thing to do and every Windows user must know about this. Because your computer has come along with an inbuilt virus scanner and remover, you should make the most out of it.
So, in this case, make sure to run this scanner before using any other software inside your PC. The process of using this program is as follows.
- Click on the Windows button and the Start Menu.
- Select on the Settings option or icon.
- Click Windows Defender
- Now, click Open Windows Defender.
- Go to the Shield Icon.
- Locate the Advanced Scan and click on it.
- After that, choose the Full Scan option.
This malware scan can take a good amount of time depending on the number of files stored inside your PC. Just give it some time.
Once the virus is completed, make sure to delete all the scanned files which could be harmful to your computer and this thing is done, just restart your computer. See if your problem is solved.
4. Reinstall Skype if you have
If you are using Skype on your computer, there are good chances that this software is causing this issue for you. In fact, lots of people on the internet have admitted that this high CPU usage issue was fixed just when they simply delete and then install the Skype software again on their computer.
This thing can work for you too. You just have to give it a try. But, before doing it, make sure to have your Skype login details written somewhere.
Also, if you have important data inside the software, save it on your PC. Because, once you have deleted the software, nothing is going to get back.
The process to follow is given below. So, make sure to follow is properly. There are various other things you can do to delete this software but this is perhaps the best and simple way.
Let’s see how you can do it.
- Click on Windows Search Bar and Search for Control Panel.
- Find and click the Programs and Features option in the Control Panel.
- Inside this menu, just find the Skype software and right-click on it.
- Just click Uninstall and let your computer delete the software and its related files from your computer.
- Now, go to the official website of Skype and install the software again from there.
You can do a restart if you want. Otherwise, check if the issue is fixed now. It should be gone now. If it is still persisting, we have another solution for you.
What if the problem is not fixed even after doing these things?
In that case, your computer is probably having some other internal issues. This could be related to the drivers, files, settings, or the Operating System itself.
In that case, we suggest you take your computer to an expert who can look up deeply inside it. They might have to open it up or do some advanced troubleshooting steps you can’t do on your own.
You can try to get in touch with Windows technical support numbers if you want. But, we suggest you find your computer or laptop’s authorized service station and take your computer directly to them.
There could be something wrong with the analytics parameters. There could be some issues with your Audio devices like speakers etc. Also, your CPU can have some issues.
There are hundreds of things your computer could be facing right now. So, it is time to take it to an expert who can see what wrong with it.
Final Verdict
Above of all methods are fully tested and trusted by us. But, we suggest you follow them only if you are aware of what you are going to do next. Always advised to do these things on your own responsibility.
If you are following them in the way they are given, you are good to go. We have tried them on your computers and everything is fine for us. You will also be able to get this thing done easily.
With that said, we hope we have helped you to know about how to fix the audio device graph isolation high CPU usage issue.
We also hope you have found the whole article helpful. If yes, consider sharing it with others too. It will be like an appreciation for our hard work. Also, you can give us your valuable feedback in the comment section.
We would love to hear from your side now. You are free to give us new suggestions for the latest articles. We will be happy to help you with everything we can.
Along with that, we keep publishing regular articles here. So, it would be good if you stay connected with us.
Thanks for reading!